Inherited and Assigned Permissions
Permissions control the
creation, management, and use of public folders and their contents and
are either granted by inheritance or assigned. A public folder inherits
its permissions from parent objects. For example, a top-level folder
will inherit permissions from the administrative group and from the
Exchange organization. Similarly, a child folder will inherit
permissions from its parent folder in the public folder tree. When you
create a public folder, you need to assign permissions that specify the
individuals or groups that will have the rights to perform designated
activities in that folder. You can assign both client access permissions
and administrative rights to the folder.
Child folders inherit
parent folder settings only at the time they are created. By default,
any changes that you later make to a parent folder will not
automatically be inherited by child folders. However, you can have the
permission changes that you make to a parent folder applied to every
child folder. To do this, perform the following steps:
1. | Right-click
the parent folder whose permissions you want to propagate, point to All
Tasks, and then click Propagate Settings. The Propagate Folder Settings
dialog box is shown in Figure 1.
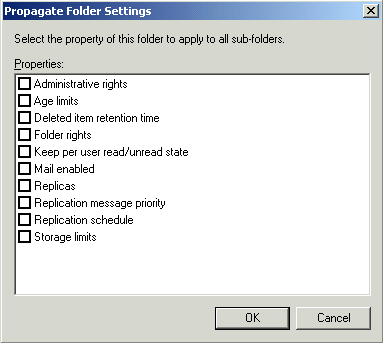
|
2. | While you can propagate a number of settings, here you only want to click Folder Rights. Click OK to finish.
|
Important
Any
changes you make specifically to a child folder will be lost if you
choose to propagate those settings from the parent folder. |
Permission Categories
There are three categories of permissions for public folders in Exchange, as shown in Table 1.
Table 1. Public Folder Permission Categories
| Permission | Description |
|---|
| Client permissions | Enables
you to control the permissions of the users who are accessing the
public folder. For example, you can control who has read and write
permissions on a public folder. |
| Directory rights | Enables you to control which users can manipulate a mail-enabled public folder object that is stored in Active Directory. |
| Administrative rights | Enables
you to assign specific administrative permissions to specific
administrators. For example, you might want to grant only three of the
10 administrators at your company the rights to replicate certain
sensitive public folders. Administrative rights are inherited by child
folders from their administrative group. Administrative rights applied
to a folder are not inherited by child folders by default but can be
propagated to child folders. |
Configuring Permissions
Client
permissions are the type of permissions an administrator most commonly
works with, and there are two ways to configure them. The first way is
by using Exchange System Manager. Right-click a public folder, click
Properties, then click the Permissions tab, and then click Client
Permissions to open a dialog box similar to the one shown in Figure 2.
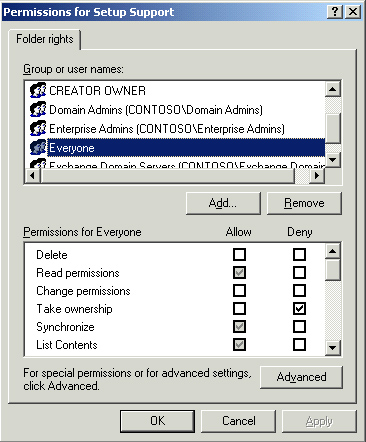
Here, you can add users
and groups and configure a granular level of access to the folder. You
can also configure advanced Folder Rights by clicking Advanced. By
default, everyone can read and write to public folders that are created.
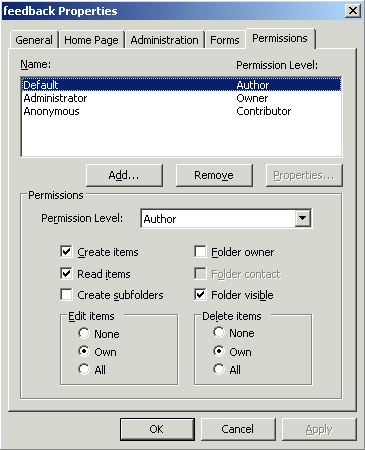
The easier way to
configure client permissions is by using Outlook, which uses roles-based
permissions rather than the more detailed Folder Rights.
1. | Open Outlook, expand the Public Folders node in the folder list, and then expand All Public Folders.
|
2. | Right-click a public folder and click Properties, and then click the Permissions tab, shown in Figure 3.
|
3. | By
default, everyone has the Author permission level, which gives them the
right to read and create items and to edit and delete their own items.
Tip The
Permissions tab is available only to users and groups that have been
configured with the Folder Owner permission role. Non-owners cannot
manipulate permissions. |
|
4. | To add users and groups, click Add and then assign each the desired role.
Tip Because
Outlook can see only public folders in the Default public folder tree,
it cannot be used to configure permissions for public folders that
reside in General Purpose trees. You will have to use Exchange System
Manager to configure those permissions. |
|
More client security settings can be configured by clicking the Administration tab, shown in Figure 4, in the public folder’s properties.
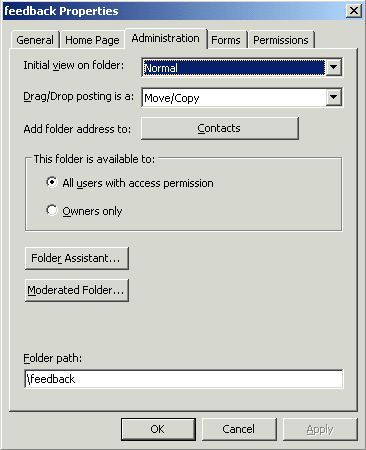
The
settings on this tab that are related to security are This Folder Is
Available To and Moderated Folder. You can choose whether all users with
access permission can use the folder (the default) or whether only
users and groups assigned the Folder Owner role can use the folder. A
moderated folder is one that requires a moderator to approve all
messages that get posted to the folder. This is often used in customer
mailing lists or forums where it is highly desirable to limit the amount
of off-topic traffic that gets posted. When you click Moderated Folder,
the Moderated Folder dialog box, shown in Figure 5, opens.
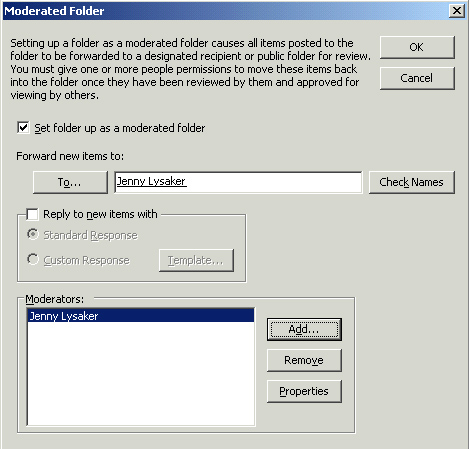
To configure a
moderated folder, you must first select the check box to make the folder
a moderated folder. Next, you need to assign a user or group to which
new messages to the folder should be forwarded. These users will view a
message for content and decide if it should be posted. Finally, you
assign moderators that have the authority to move the messages into the
folder upon approval. You can also have an automatically generated
e-mail sent in reply to new messages to explain to the sender that the
folder is moderated and that they will not see their post until it is
approved. You can use a standard response or create your own custom
response.
Configuring Directory Rights
Directory
rights control what users and groups have permission to change
e-mail-related attributes of a mail-enabled public folder. By default,
only the Administrator account and members of the Administrators,
Enterprise Admins, Exchange Domain Servers, and Exchange Enterprise
Servers groups have these permissions. Authenticated Users are able to
read permissions but not to do anything else. Generally, these settings
are sufficient and don’t need to be changed. To change the directory
rights, perform the following steps:
1. | Right-click the public folder in Exchange System Manager and click Properties.
|
2. | Click the Permissions tab, and then click Directory Rights.
|
3. | Add users or groups as desired and configure the permissions you want them to have.
|
4. | Click OK when you are done, and then click OK again to finish.
|
Configuring Administrative Rights
Administrative rights
control the users and groups that can use Exchange System Manager, a
custom Microsoft Management Console (MMC) console, or any other
administrative utility to change the replication, storage limits, and
other settings for a public folder. By default, only administrators in
the Active Directory domain and enterprise have administrative rights to
a public folder.
Configuring
administrative rights is similar to configuring directory rights. Both
are configured on the Permissions page of a public folder’s properties.